Ingredients
Equipment
Method
- Bake, cool, and chill the layers before decorating. Trying to fill and frost a warm cake can soften the buttercream and pull crumbs from the layers.
- For a more manageable project, prepare the cake layers first and decorate them in a separate session. You can also practice the piping on parchment paper before working on the cake.
How to Make a Unicorn Cake Step by Step
- Prepare and Color the Cake Batter
- Prepare the white cake mixes according to their package directions. Divide the batter evenly among four bowls so the finished layers will be similar in thickness.
- Add gel food coloring to each bowl, starting with a small amount and mixing thoroughly before adding more. The original cake uses pink, yellow, green, and blue. Scrape the sides and bottom of each bowl so you do not leave streaks of uncolored batter.
Fill the Pans and Bake
- Prepare your pans according to the cake mix and pan instructions, then divide the colored batter among them. Spread the batter evenly without overfilling the pans. If you have more batter than your pans can accommodate, bake the remainder separately.
- Use the oven temperature specified on the cake mix package. The shallow layers in my original class were approximately 1 inch thick, so I began checking them at the 15-minute mark. That is a first check, not a guaranteed baking time.
- Check the center of each layer with a toothpick. It should come out without wet batter. The surface should also look set rather than wet or sunken.
Cool, Chill, and Check the Layers
- Let the cakes cool enough to remove them from their pans without breaking, then finish cooling on a rack.
- Once completely cool, wrap the layers and chill them until firm. Chilled layers are easier to handle and usually shed fewer crumbs as you frost them. Freezing is optional; the important checkpoint is that the layers feel firm enough to lift and stack.
- Check the tops before assembly. If a layer has a dome, trim it so the next layer can sit evenly. My tutorial on how to torte and level a cake explains how to make a controlled, level cut.
Stack and Fill the Cake
- Place a small dab of buttercream on the cake board to help hold the first layer in position. Center that layer on the board, then spread an even layer of buttercream over it.
- Add the next cake layer and check the alignment before continuing. Repeat with the remaining layers, keeping the filling thickness consistent. Look at the stack from more than one side so you can correct a lean before coating the cake.
- The filling should reach the edges without forming thick bulges between the layers.
Apply the Crumb Coat
- Spread a thin layer of white buttercream over the top and sides. This first coat traps loose crumbs; it does not need to hide the colored layers completely.
- Keep a separate bowl for buttercream scraped from the cake so crumbs do not get mixed into the clean frosting.
- Chill the crumb-coated cake until the surface is firm enough that another coat will not drag it around. Some American buttercream recipes also form a surface crust, but the setting time depends on the recipe and room conditions.
Add the Final White Frosting Coat
- Apply a fresh coat of white buttercream to the top and sides. Use an offset spatula to spread it, then smooth the sides with a scraper or the straight edge of your spatula.
- Work with small adjustments. Fill low spots, scrape away excess frosting, and clean your tool between passes. Bring the frosting at the top edge gently toward the center to tidy the rim.
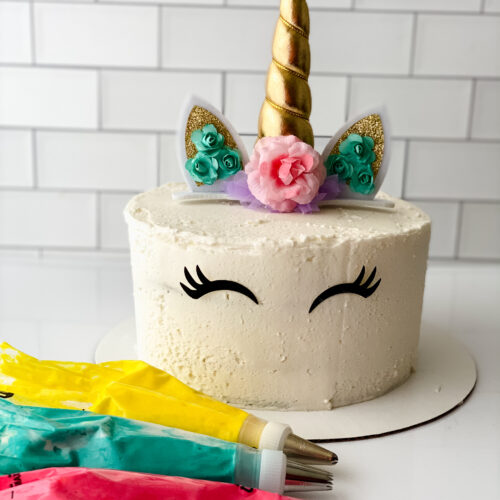
- The white coating creates the background for the eyelashes and colorful mane. Aim for an even surface, but do not keep scraping once repeated passes stop improving it.
Prepare the Colored Buttercream
- Divide your decorating buttercream among bowls and add your chosen gel colors. Fit the piping bags with star tips and compatible couplers if you want to change tips without changing bags.
- The buttercream should be firm enough to hold the ridges from the star tip but soft enough to pipe without excessive pressure. Test a rosette on parchment paper. If its ridges disappear or it slumps, the buttercream is too soft. If the edges look torn and the frosting is difficult to squeeze, it may be too stiff.
- Avoid overfilling the bags. You need enough room to close the top and control the pressure comfortably.
Position the Horn, Ears, and Eyelashes
- Choose which side of the cake will face forward. Position the horn near the center of the top and place an ear on either side, following the topper manufacturer’s instructions.
- Place the eyelashes on the front, checking their height and spacing before pressing them gently into the buttercream. Step back and look at the whole face before piping around it.
- Use decorations intended for cake use, and remove nonedible toppers and their supports before slicing.
Pipe the Buttercream Mane
- Hold the star tip approximately perpendicular to the surface where you are piping. Start with a small center, then move the tip in a tight circle around it while maintaining steady pressure. Stop squeezing before lifting the tip away.
- Pipe clusters of rosettes around the horn and between the ears, bringing some of the mane toward the forehead. Alternate colors and tip sizes to create variation while keeping the eyelashes visible.
- Fill small spaces with star dollops. To make a dollop, hold the tip in place, squeeze briefly, stop pressure, and lift away. These smaller shapes help connect the rosettes without crowding the design.
- The star tips from the original class produce relatively small decorations. Rosette size will depend on the tip opening and how far you circle around the center.
Finish the Base and Add Sprinkles
- Pipe a border around the bottom edge to connect the design and cover the seam where the cake meets the board. Use star dollops or small rosettes in the same colors as the mane.
- Add optional sprinkles while the buttercream is still soft enough for them to adhere. Check the cake from the front and sides, then stop when the design looks balanced. Every space does not need another decoration.
Video
Notes
What do I do if I don’t have a piping bag?
While I strongly encourage you to purchase piping bags, you may use a small sandwich bag but it will require you to have a piping tip
Can I use plastic tips?
Yes you can use the plastic decorating tips. However you will not be able to change out the tips while you’re decorating.
Why do we use couplers when decorating?
The couplers make it easy for you to change the piping tip while still using the same color
What’s the best way to clean the piping tips?
Boil them in hot water and allow them to air dry.
Best practices
Make sure you hold your piping bag at a 45° angle. Apply even pressure when squeezing out the icing. Stop squeezing and then pull your tip away.