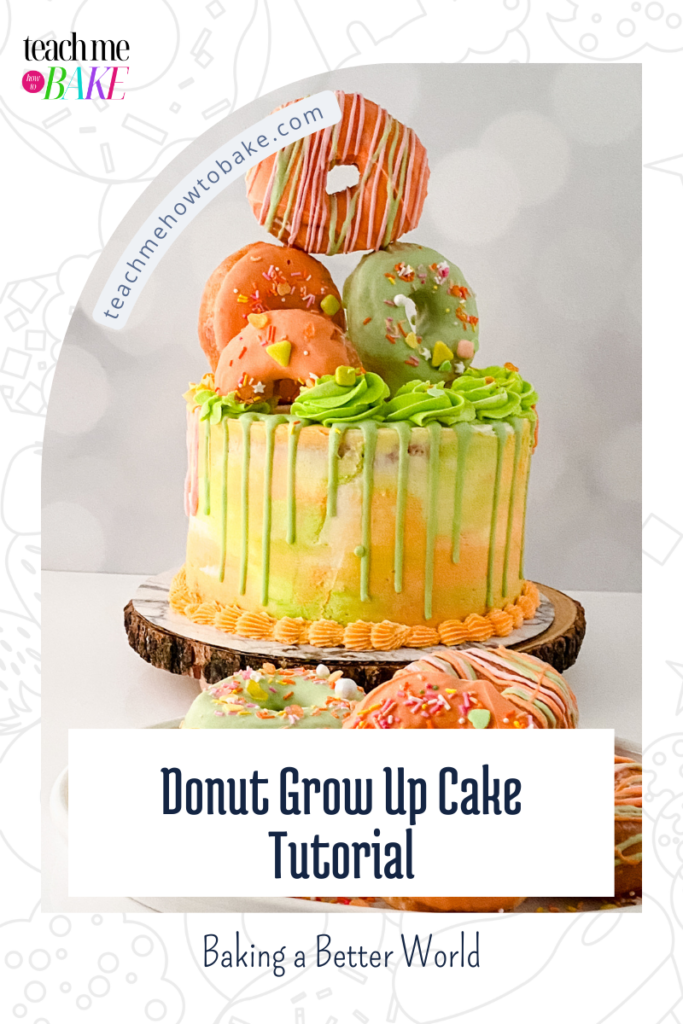
How to Make a DoNut grow up cake
Learn how to create a vibrant and delicious Donut Celebration Cake with this step-by-step tutorial. Combine marbled cake, colorful buttercream, and glazed donuts for a stunning and scrumptious masterpiece. Perfect for beginners, this easy-to-follow guide will help you become a cake-decorating pro in no time. Indulge in the joy of baking and let your creativity shine!
Get ready to embark on a fun and vibrant cake-decorating journey. In this tutorial, we’ll combine the charm of glazed donuts with a beautifully marbled cake and rosette piping. Let’s dive in and create a delicious masterpiece that will leave everyone in awe!
Equipment:
- Turntable
- Offset spatula
- Cake smoother (bench scraper)
- Gel food colors of your choice
- Piping bags (5)
- Small star piping tips
- Cake board or cake drum
- Skewers (3-4)
- Toothpicks (optional)
Preparation Time: 60 minutes Decorating Time: 45 minutes Total Time: 2 hours Difficulty: Easy

Ingredients:
- 4-6 Glazed Donuts
- 1 cup electric green candy melts
- 1 cup orange candy melts
- ½ cup pink candy melts
- 2 8-inch cakes (baked & cooled)
- 3-4 cups Buttercream


Decorating the Donuts
- Melt the candy melts with a tablespoon of coconut oil or paramount crystals in the microwave in 30-second increments until smooth.
- Dip the donuts into the melted chocolate and immediately add sprinkles.
- Allow the donuts to sit until the chocolate hardens.


Preparing the Cake
- Place a dollop of buttercream in the center of the cake board.
- Position one of the cakes on top, using the buttercream as a “glue” to hold it in place.
- Add a layer of buttercream to act as a filling on the first cake layer.
- Place the second cake layer on top.
- Add a layer of white buttercream to the outside of the cake and smooth it down. It doesn’t need to be perfect.


Creating a Marbled Pattern
- Dye a cup of buttercream green and another cup orange (or your chosen colors).
- Spoonfuls of colored buttercream randomly around the cake, leaving spaces in between.
- Use a bench scraper or cake smoother to blend the colors, creating a marbled pattern.


Adding the Chocolate Drip
- Reheat the leftover candy melts from the donuts in the microwave, still inside the piping bags, for 20-30 seconds until no longer solid.
- Add a drip effect going around the cake. The chocolate should be fluid and flow nicely, especially if using the chocolate from the donuts with added oil. Remember, a little goes a long way.


Piping Rosettes and Placing Donuts
- While the chocolate sets, add the remaining colored buttercream to piping bags fitted with a 1M or Tip 24.
- Pipe rosettes around the top of the cake.
- Position the glazed donuts where you want them to go on the cake.
- Use skewers to hold the donuts in place. Make sure to position the donuts off-centered so that the skewer won’t be visible.
- If necessary, cut down the skewer length and seal off the cut end with leftover chocolate to ensure no pieces come off in the cake.
- If adding a third donut on top, use toothpicks to hold it in place.


Final Touches
- Add an icing border or a ribbon border to the bottom of the cake.
- Clean up the cake board, removing any excess buttercream or chocolate, for a neat presentation.
- Find a well-lit area to showcase your masterpiece.
- Place the completed cake on a cake stand or a decorative plate for an elegant presentation.
- Ensure the cake is centered and level on the stand or plate.
- And DO NOT FORGET To Take a Photo to Share on Social Media!
Presentation and Serving
- Before serving, take a moment to admire your creation.
- Use a sharp knife or a cake server to slice and serve the cake to your eager guests.
- Be prepared for the “oohs” and “aahs” as they discover the delightful surprise of donuts incorporated into the cake.
Storage and Shelf Life
- If there are any leftovers, store the cake in an airtight container in a cool place.
- Consume the remaining cake within 2-3 days to ensure the best taste and texture.
Experiment and Enjoy!
- Now that you’ve mastered the Donut Celebration Cake, don’t be afraid to experiment with different icing flavors, colors, and decorations.
- Add your personal touch by incorporating your favorite toppings or fillings.
- Enjoy the creative process and continue exploring the world of cake decoration.
Let’s Party
You have successfully completed the Donut Celebration Cake tutorial! By following these step-by-step instructions, you have created a colorful and visually stunning cake that combines the joy of donuts with the art of cake decoration. Share your creation with friends and family, and let them delight in the sweet and whimsical masterpiece you’ve crafted. Remember, the world of cake artistry is full of endless possibilities, so keep honing your skills and creating edible works of art. Happy baking and decorating!
Note: Feel free to personalize the colors, decorations, and flavors of the cake to suit your preferences. Let your creativity shine and have fun throughout the decorating process!
Check Out Our Other Decorating Tutorials
- How to Make a Ninja Turtles Face Cake
- How to make Harry Potter’s birthday cake
- How to Make a Stunning Barbie Dress Cake: Step-by-Step Tutorial
- How to Decorate a Tray (Sheet) Cake
- How to Make a DoNut Grow-Up Cake
- How to Make a Glow in the Dark Cake
- How to make the cartoon SLICE cake
PIN for Later